
Wood Carving for Beginners: A Safe Way to Start Whittling at Home
Wood carving is an approachable hobby that lets you create something with just a knife and a piece of wood. It’s calming, rewarding, and great for sharpening focus and patience. Whether you’re shaping a simple wand or carving detailed designs, this guide walks you through the basics - from choosing tools and wood to staying safe and starting your first project.
Let’s dive into what you’ll need and how to begin carving with confidence.
Picking Your Wood and Tools
Best Wood Types for Beginner Carvers: Hardness Ratings and Characteristics
Starting your wood carving journey begins with selecting the right wood and tools. A few well-chosen materials can make the experience both safe and enjoyable, especially if they match your skill level.
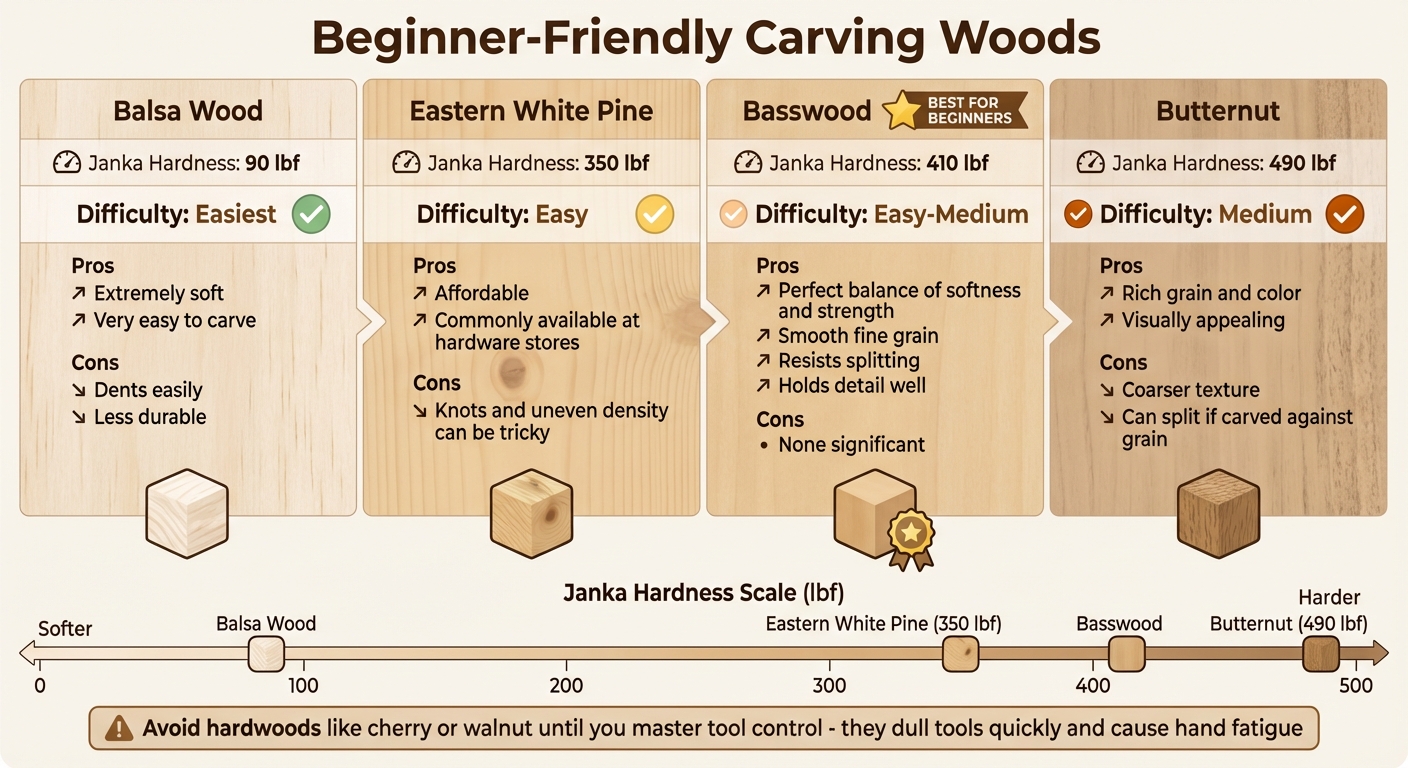
Best Woods for Beginners
If you're just starting out, basswood is a fantastic choice. With a Janka hardness rating of 410 lbf (pounds-force), it strikes the perfect balance - soft enough to carve easily but sturdy enough to hold detailed designs. Robert Maxwell, a seasoned carpenter, shares:
Regardless of the style of carving, basswood is a great material for beginner carvers. It's smooth and fine-grained with an ideal carving density.
Its even grain structure resists splitting, making it forgiving as you practice controlling your tools.
If basswood isn’t an option, consider Eastern White Pine (350 lbf), a softer wood commonly found at hardware stores. While affordable, it can be tricky due to knots and uneven density. Another option is balsa wood, which is extremely soft with a Janka rating of 90 lbf, though it dents easily. For a wood with more visual appeal, butternut (490 lbf) offers a rich grain and color. However, its coarser texture requires careful attention to avoid splitting, especially if you cut against the grain.
It's best to steer clear of hardwoods like cherry or walnut until you’ve mastered tool control. These woods can quickly dull your tools and lead to hand fatigue, turning an enjoyable hobby into a frustrating task. Always carve with the grain, following the natural lines in the wood, to minimize resistance and prevent splintering.
Basic Tools You'll Need
Your first tool should be a carving knife. Unlike standard pocket knives, carving knives feature larger handles and smaller, curved blades for better precision and control. As you progress, you might add:
- Gouges: These U-shaped blades are perfect for scooping and creating rounded shapes.
- Chisels: Flat blades that help with straight cuts and smoothing surfaces.
- V-tools: Ideal for fine details and outlining.
Don’t forget sharpening supplies - keeping your tools sharp is essential for both safety and efficiency. A sharpening stone (600+ grit) and a leather strop are must-haves. As Schaaf Tools highlights:
Having good tools makes all the difference in your ability to learn quickly and effectively.
Sharp tools require less effort, reducing the risk of slips and accidents.
Setting Up Your Workspace and Safety Gear
A well-organized workspace is just as important as the tools you use. Work on a sturdy table or bench with proper lighting to see your project clearly and position your hands safely. Use clamps or a bench-top vise to secure your wood, allowing you to focus entirely on controlling your tools. This simple precaution greatly reduces the chance of injury.
Safety gear is non-negotiable. Always wear a cut-resistant carving glove, typically made from Kevlar, on your non-dominant hand - the one holding the wood. Kevin Kessinger, founder of Pro Wood Carving, stresses:
Wood carving gloves can stop a slicing cut, making them one of the most critical pieces of safety equipment a woodcarver should own.
Pair your gloves with safety glasses to shield your eyes from flying wood chips. And always carve away from your body, keeping your hands behind the blade for added safety. Lastly, set up a dedicated sharpening station to keep your tools in top condition and maintain precision while carving.
With the right setup, you’ll be ready to carve safely and confidently.
sbb-itb-8216914
Basic Safety Techniques
Now that your workspace is ready and your tools are in place, it's time to focus on staying safe while carving. These aren't just optional tips - they're essential habits that help you avoid injuries and make carving more enjoyable.
Safety Rules to Remember
The number one rule in wood carving is straightforward: always carve away from your body. Never pull the blade toward your hands or torso. If a tool slips, it should move into open air, not toward you. Keep both hands behind the sharp cutting edge, and always secure your workpiece with clamps or a bench-top vise instead of holding it loosely in your lap.
Believe it or not, sharp tools are safer than dull ones. As Benjamin Beck, a seasoned carver, puts it:
Dull tools are dangerous - they force you to use more pressure, and that's when accidents happen.
A sharp blade requires less effort and gives you greater control. To keep your tools sharp, strop your knife every 15–20 minutes. If your blade starts dragging or doesn’t cut cleanly, it’s time to use a sharpening stone. These simple habits lay the groundwork for safe carving, as explained further below.
How to Hold Your Knife and Position Your Body
A proper grip and body position are key for maintaining control and reducing risks. For precise cuts, try the thumb-push technique: hold the wood with your non-dominant hand and press your thumb against the blunt side of the blade to guide the cutting force. Your dominant hand controls the direction of the cut. Avoid forcing the blade - use steady, controlled wrist movements instead.
Wrist movements naturally limit the range of any accidental slips, giving you better control. Always work on a stable surface and avoid carving in your lap. Make sure you're seated comfortably and can clearly see your work without straining. Mastering this technique helps you avoid common mistakes, as discussed next.
Mistakes to Avoid
New carvers often make some errors that can compromise safety. One of the most common is using dull tools. A dull blade requires more pressure, increasing the likelihood of slips or accidents. Keeping your tools sharp is crucial for safe and effective carving.
Another frequent mistake is carving against the grain. This can cause the wood to splinter or tear, making your knife catch unexpectedly. When carving with the grain, wood shavings curl smoothly. If they don’t, or if the wood resists, you’re likely going the wrong way. Stop, adjust your angle, and approach from a different direction instead of forcing the cut. Lastly, rushing through a project often leads to mistakes and accidents. Wood carving rewards patience and deliberate, steady movements. By avoiding these pitfalls, you'll build on the safety practices outlined above.
Simple Projects to Practice
With a solid understanding of safety basics, it's time to dive into some hands-on carving. Starting with straightforward projects allows you to build confidence, improve your technique, and get a feel for how wood reacts to your tools. These beginner-friendly exercises are a great way to apply what you've learned so far.
Getting Ready to Carve
Preparation is key to a smooth carving experience. Begin by sharpening your knives and gouges until they're razor-sharp. Check your wood for dryness, and remove any knots or cracks that could interfere with your work. Take a moment to identify the wood grain, as carving along it will make your cuts cleaner and easier. Secure your piece firmly using clamps or a vise, and if you're working from a specific design, lightly sketch it onto the wood with a pencil. With these steps done, you're ready to start carving.
Project 1: Carved Stick or Wand
A tapered stick or wand is a great first project to practice basic whittling. Use a piece of basswood or white pine about 8–10 inches long, and sketch light guide lines to outline the shape. Begin by removing thin layers of wood with your knife, working to create a gentle taper. As Schaaf Tools points out:
Whittling also probably has the lowest barrier to entry – all you need is a sharp knife, something to keep it sharp, and a piece of wood.
Pay attention to the grain, carving in smooth, controlled strokes. If you notice tearing, adjust your cutting angle. Once the basic shape is formed, refine it with smaller, precise cuts. Try practicing a scooping motion by angling the knife upward as you cut. When you're happy with the shape, use sandpaper to smooth the surface, starting with a coarse grit and gradually moving to finer ones. Finish the project with a protective coat of paste wax or Danish oil. This simple exercise helps you master the basics and prepares you for more detailed work.
Project 2: Simple Relief Carving
Relief carving is a fantastic way to practice shallow, controlled cuts and explore different tools. This technique involves carving a design into a flat wooden panel, creating a three-dimensional effect while keeping the back flat. Start with a small basswood board, about 6 inches square, and sketch a simple design like a leaf or star. Secure the board with clamps, then use a U-gouge to remove the background, leaving your design raised. Work slowly, carving thin layers and following the grain. For finer details, switch to a V-gouge, and use a chisel for flat areas or straight edges. Control your tools with your wrist for better precision. Once complete, sand the surface with progressively finer grits, up to 220 grit, and finish with a sealer or stain. This project helps you develop patience and precision, both crucial skills for carving.
Cleaning Up After You Carve
After finishing your project, clear away wood shavings and debris to keep your workspace tidy. Wipe down your tools to remove any dust or moisture, and store them in a dry, safe place like a tool roll or case to prevent rust or damage. A clean and organized workspace not only protects your tools but also makes your next carving session more enjoyable. If you're looking for a convenient way to start, This Month's Craft offers kits with all the materials and tools you need, along with step-by-step instructions to guide you through your carving journey.
Taking Care of Your Tools
Keeping your tools sharp and well-maintained is essential for precision and safety. With the right care, your tools will last longer and perform better, making every project more enjoyable.
How to Sharpen Your Tools
Sharpening your tools involves two main steps: restoring the edge with sharpening stones and refining it with a strop. If your blade is very dull, begin with a medium-grit stone, then move to fine and ultra-fine grits for a polished edge. Hold the blade at a 10–20 degree angle and use smooth, controlled motions to swipe it across the stone. For softer woods like basswood, aim for about a 17-degree angle, while harder woods may need 25 degrees or more. Don't have sharpening stones? You can also use 600+ grit sandpaper with water or oil as a substitute.
Once the edge is restored, switch to a leather strop coated with sharpening compound to polish it to razor sharpness. Lay the blade flat on the strop and pull it toward you, keeping the sharp edge trailing away. Apply steady downward pressure as you work. As Mike Lawrence, Founder of The Woodcarver's Cabin, suggests:
Strop it often, and you will seldom - if ever - use the stones again.
To check if your blade is sharp enough, test it on a piece of scrap wood. A sharp blade will leave a clean, shiny cut without any nicks or streaks.
Cleaning and Storing Your Tools
After you’re done carving, brush off any wood dust or use canned air to clean tight spots. Store your tools in a dry case to prevent rust and keep them safe from damage. Proper storage ensures they’re always ready for your next project.
Tool Maintenance with This Month's Craft

This Month's Craft kits come with beginner-friendly tools and detailed maintenance instructions, making it easy to stay safe and efficient. With consistent care, your tools will remain reliable companions for all your creative endeavors.
FAQs
How can I safely start wood carving as a beginner at home?
To begin wood carving safely, start with a sharp, fixed-blade whittling knife and pick a soft wood like basswood, which is ideal for beginners. Make sure to wear protective gloves and safety glasses to minimize the risk of injuries. Set up your workspace in a stable, well-lit, and ventilated area, and always keep your tools sharp for cleaner cuts and better control.
When carving, hold the wood securely and always carve away from your body to avoid accidents. Regularly check and maintain your tools to ensure they stay in good working condition. By following these precautions, you can enjoy wood carving safely and with confidence.
What are the best types of wood for beginners to start carving?
If you're just starting out with wood carving, soft, fine-grained woods are your best bet. Beginner-friendly choices include basswood (also known as linden), pine (choose pieces without knots), balsa, butternut (sometimes called white walnut), and aspen. These woods are easy to carve yet sturdy enough to hold detailed designs, making them ideal for practicing basic techniques.
When picking your wood, aim for pieces that are smooth, free of cracks, and comfortable to work with. Choosing the right material from the start can make the process both safer and more enjoyable.
What’s the best way to keep my wood carving tools sharp and in good condition?
To keep your wood carving tools in peak condition, it’s essential to sharpen them regularly. Use a sharpening stone set, starting with a medium grit before progressing to fine and ultra-fine grits. Finish the process with a leather strop to achieve a smooth, razor-sharp edge. Be sure to maintain a consistent sharpening angle between 10–20° for the best results.
After each use, clean and dry your tools thoroughly to prevent rust from forming. Store them in a dry, secure location to protect the edges and ensure they’re ready for your next carving project.