
Soap Making 101: Why It’s Easier (and Cleaner) Than You Think
Soap making might sound complicated, but it’s surprisingly simple with the right tools, a few ingredients, and some basic steps. You don’t need a lab or special skills to create nourishing soap bars at home. Plus, by making your own soap, you can control the ingredients, save money, and enjoy a fun, hands-on hobby. Let’s break down the process and clear up some common misconceptions so you can get started confidently.
Many beginners worry about lye, but it’s safe when handled properly. Think of it like cooking with a hot stove - caution is key. And no, your finished soap won’t contain lye; the chemical reaction (saponification) transforms it completely into soap and glycerin. You also don’t need fancy equipment - most of what you’ll use is already in your kitchen, like a digital scale, stainless steel pot, and stick blender. The hands-on time? About an hour.
Homemade soap gives you control over what goes on your skin. Unlike store-bought bars, which often contain detergents and synthetic additives, your soap will retain natural glycerin for extra moisture. Customize it with oils, clays, or essential oils to suit your needs. Even better, making soap in bulk can cost less than $1 per bar.
Here’s a quick look at what you’ll need:
- Ingredients: Oils (like olive or coconut), lye, distilled water.
- Tools: Mixing containers (avoid aluminum), spatulas, molds, a stick blender, and safety gear (goggles, gloves).
The process is straightforward: mix lye with water (always add lye to water, not the other way), combine with oils, blend until thick, pour into molds, and let cure for 4–6 weeks. You’ll end up with bars that are gentle, long-lasting, and satisfying to use.
Soap making is a rewarding hobby that’s easier than you think. Ready to try it? Grab your ingredients, follow a reliable recipe, and enjoy the process of crafting something both practical and personal.
What You'll Need to Get Started
You don’t need a lab full of expensive tools to dive into soap making. In fact, most of what you’ll need is probably already in your kitchen, or you can grab it without breaking the bank at a local store. Let’s go over the essentials.
Basic Ingredients
Soap is created through a process called saponification, where oils or fats combine with lye and water to transform into soap and glycerin.
- Oils or Fats: These are the base of your soap. Popular options include olive oil, coconut oil, shea butter, and cocoa butter. You can also use animal fats like lard or tallow. Each oil brings its own qualities - coconut oil, for instance, creates a bubbly lather, while olive oil makes a gentle and moisturizing bar.
- Lye (Sodium Hydroxide): This is the key ingredient that turns oils into soap. Look for 100% pure sodium hydroxide, often found at hardware stores or through reputable suppliers. Avoid products with additives or drain cleaner blends. As Jan Berry, author and soapmaker, advises:
"A digital scale is essential! Don't measure soapmaking ingredients by volume (cups, tablespoons, etc.) as it's just not accurate enough."
- Distilled Water: Using distilled water ensures a cleaner soap. Tap water can work, but its minerals might interfere with the lather or cause soap scum.
For a more skin-friendly bar, many soapmakers practice superfatting, which involves adding a bit more oil than the lye can fully convert. This leaves extra oils in the soap, making it more moisturizing.
With your ingredients ready, let’s talk about the tools that will make your soap-making experience smooth and efficient.
Tools and Equipment You'll Use
You don’t need specialized equipment, but having the right tools is crucial to making the process easier and safer. Here’s what you’ll need:
| Tool Category | What to Use | What to Avoid |
|---|---|---|
| Mixing Containers | Stainless steel, heavy-duty plastic (#2 or #5), enamel-lined | Aluminum, glass, Pyrex, non-stick surfaces |
| Spoons/Spatulas | Silicone, stainless steel, heavy-duty plastic | Aluminum, wood (can splinter) |
| Molds | Silicone, lined wood, repurposed plastic containers | Unlined metal, unlined cardboard |
- Digital Scale: Accuracy is key, and a scale ensures your measurements are precise.
- Immersion (Stick) Blender: Speeds up the process by helping your mixture reach "trace" (a pudding-like consistency) much faster than stirring by hand.
- Thermometer: A candy or infrared thermometer is perfect for keeping an eye on temperatures during the process.
- Safety Gear: Protect yourself with safety goggles, rubber or nitrile gloves, long sleeves, and an apron when working with lye.
For molds, you can get creative - lined cardboard boxes, empty milk cartons, or plastic food containers all work well. If you’re not using silicone molds, line them with freezer paper to ensure your soap releases easily.
One important safety tip: never use aluminum. Lye reacts with aluminum, releasing toxic fumes. Stick to stainless steel or heavy-duty plastic containers marked with recycling codes #2 (HDPE) or #5 (PP). While some might suggest glass, it’s best avoided since lye’s heat and caustic properties can weaken glass over time, potentially causing it to break.
With these tools and ingredients, you’re all set to start your soap-making adventure!
How to Make Soap: A Simple Step-by-Step Process
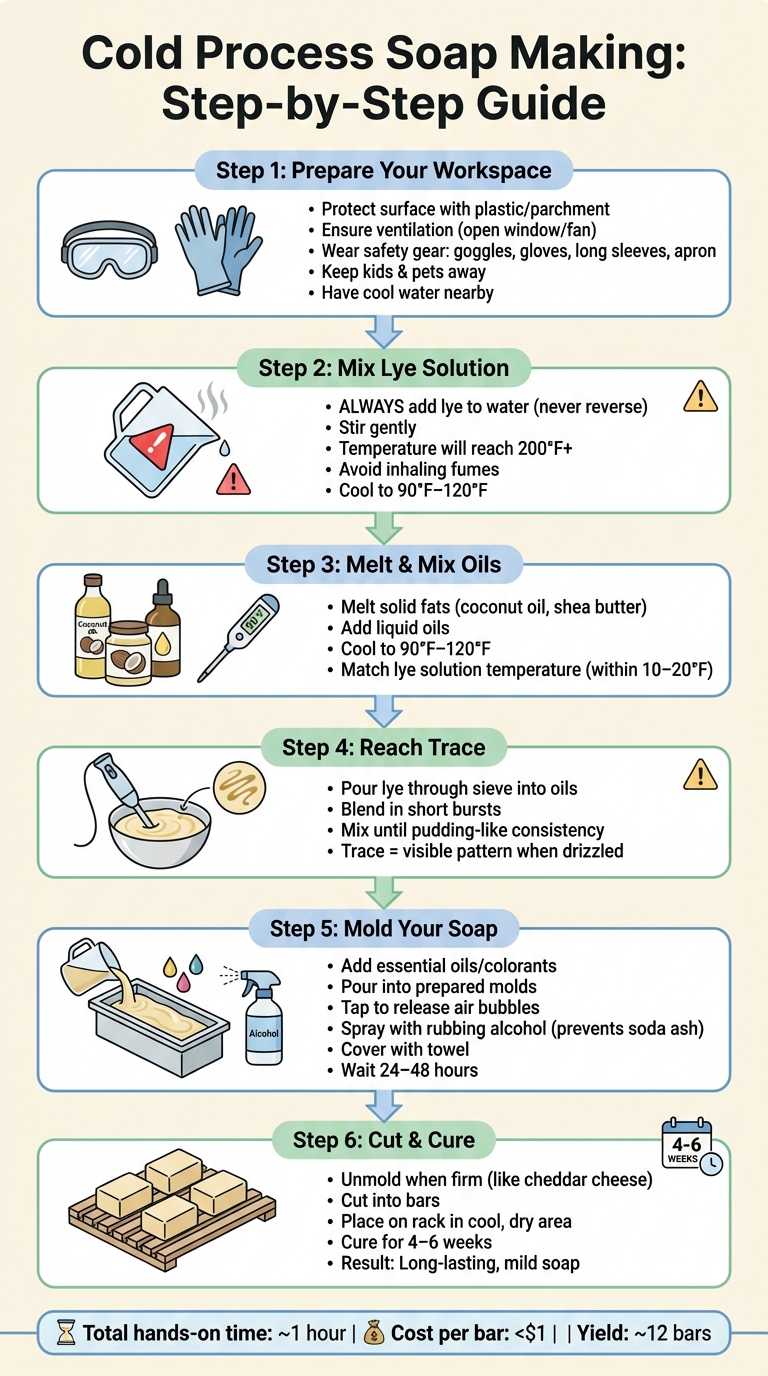
Cold Process Soap Making: 6-Step Visual Guide from Preparation to Curing
If you're ready to dive into soapmaking, the cold process method is a great place to start. By following these steps, you’ll create beautiful bars while keeping safety a top priority.
Setting Up Your Workspace
Before mixing a single ingredient, take a moment to set up your work area properly. Choose a flat, stable surface and protect it with plastic wrap or parchment paper to avoid damage from spills.
Ventilation is key - work near an open window, under an exhaust fan, or even outside if the weather allows. Lye fumes can be intense, especially during the early stages of mixing.
Keep kids and pets out of the area, and make sure all your tools and ingredients are within reach. Sanitize your equipment with rubbing alcohol or a 5% bleach solution. Use a digital scale to measure your ingredients by weight for accuracy. Safety gear is non-negotiable - put on gloves, goggles, long sleeves, and an apron. Keep a bowl of cool water nearby in case of accidental lye contact with your skin.
Once everything is in place, you're ready to mix your ingredients.
Mixing Your Ingredients
The first step is preparing your lye solution. Here’s an essential rule to remember: always add lye to water, never the other way around. Soapmaker Jan Berry explains it perfectly:
"Always add lye to water and other liquids. (Not the other way around.) You can remember this by thinking of snow (the lye) falling on a lake (the water)."
Slowly pour the lye into distilled water while stirring gently. The mixture will heat up quickly - sometimes over 200°F - so handle it carefully and avoid inhaling the fumes.
While the lye solution cools, melt any solid fats like coconut oil or shea butter. Once melted, mix in your liquid oils. Both the lye solution and oils should cool to a temperature range of 90°F–120°F, and their temperatures should be within 10–20°F of each other for best results.
When ready, pour the lye solution into the oils through a stainless steel sieve to catch any undissolved particles. Use an immersion blender to combine the mixture, tapping the blender on the bottom of the container to release any trapped air. Blend in short bursts until the mixture thickens to a pudding-like texture, known as "trace."
Trace is the point where the soap batter thickens enough to leave a visible pattern when drizzled across the surface. For intricate designs, aim for a light trace (similar to custard). For beginners, medium trace (pudding-like) is easier to work with.
Pouring, Curing, and Cutting Your Soap
Once you reach trace, it’s time to add any extras and pour the soap into molds. Stir in essential oils or colorants, then pour the soap batter into your prepared molds. Tap the molds on the counter a few times to release air bubbles, and smooth the top with a spatula or create decorative swirls with a spoon.
To prevent soda ash, spray the surface with rubbing alcohol. Cover the molds with a towel or lid to encourage the gel phase, which enhances color vibrancy and gives the soap a polished, slightly shiny finish.
Let the soap sit for 24–48 hours. You’ll know it’s ready to unmold when it feels firm, like cheddar cheese, and easily pulls away from the mold. If it’s still soft, give it another day. Once unmolded, cut the soap into bars using a sharp knife or wire cutter.
Place the cut bars on a rack or wax paper in a cool, dry area with good airflow. Allow them to cure for 4–6 weeks, which gives the excess water time to evaporate. As Jan Berry emphasizes:
"Cure time is very important so that your soap is mild and pleasant to use."
Though the wait might test your patience, it’s worth it. Properly cured soap lasts longer, feels better on your skin, and creates a luxurious lather.
sbb-itb-8216914
Tips for Keeping Your Workspace Clean
Soap-making can get messy, especially for beginners. But with a few practical strategies, you can keep your workspace neat throughout the process. Staying organized not only makes cleaning easier but also pairs perfectly with our step-by-step soap-making guide.
Prepare Everything in Advance
A smooth and clean soap-making session starts with preparation. Think of it as your own version of mise en place: measure out all your oils, lye, water, and additives into separate containers before you begin. This keeps everything organized and reduces the chance of spills. Keep cleanup essentials like paper towels, rags, or a damp dishcloth nearby for quick access. If you notice any dry lye residue after weighing, wipe it up immediately with a damp paper towel to avoid it sticking to surfaces or causing issues later.
How to Avoid Messes While Working
Protect your workspace by covering it with newspaper or parchment paper to catch drips and spills. If possible, use a plastic folding table instead of wood to avoid potential damage. When working with lye, mix it in the kitchen sink to contain any splashes. Opt for a tall mixing container to minimize the risk of overflow, and make sure the head of your immersion blender is fully submerged before turning it on. Keeping things tidy while you work will save you time and effort when it’s time to clean up.
Cleaning Up After You're Done
Cleaning up after soap-making is easier than you might think. Many soap makers let their tools sit for 24 hours, allowing any soap batter residue to transform into soap that can be rinsed away with hot water. If you prefer cleaning right away, flush any caustic materials thoroughly with water. Always wear gloves and goggles during cleanup until saponification is complete. To make the process even smoother, use a silicone spatula to scrape excess batter into your mold before washing your tools. This small step can save you a lot of scrubbing later.
Conclusion: Give Soap Making a Try
Making your own soap is simpler than you might think and incredibly satisfying. With just a few basic ingredients, some common kitchen tools, and a little effort, you can create around 12 bars of soap for less than $1 per bar. Plus, by using the tips shared earlier, you can keep your workspace neat and organized throughout the process. It’s a straightforward craft that yields big rewards.
As one expert aptly puts it, soap making offers an excellent balance of effort and reward. The end result is soap that’s gentle on your skin, kinder to the planet, and tailored to your exact preferences. Whether you’re adding shea butter for extra moisture or your favorite essential oils for a personal touch, the possibilities are endless.
Homemade soap also gives you complete control over what goes into it. By carefully selecting your ingredients, you can avoid harsh chemicals and cut down on plastic waste, creating a product that’s both skin-friendly and eco-conscious. Following the steps outlined earlier, your soap will not only be effective and gentle but also a reflection of your creativity and care.
If you’re ready to start, grab a trusted recipe, take your time with the lye step, and let the process unfold. Watching your first batch cure into beautiful, usable bars is a rewarding experience that many find both calming and practical. Dive into this craft with confidence, and let the joy of creating your own soap inspire you to keep exploring this fulfilling hobby.
FAQs
What precautions should I take when handling lye for soap making?
When handling lye, safety should always come first. Make sure to wear long sleeves, lye-resistant gloves, and goggles or a face shield to shield your skin and eyes from potential splashes. If you have long hair, tie it back securely, and think about using a mask or respirator to avoid breathing in any fumes. Always work in a well-ventilated area, and ensure children and pets are kept far away from your workspace.
Choose a work surface that can withstand lye, and clean up spills immediately to avoid accidents. If lye happens to touch your skin, rinse it off thoroughly with lots of water. Taking these precautions will help you approach soap making with confidence and peace of mind!
How do I customize homemade soap with my favorite scents, colors, and textures?
Making your soap unique is both straightforward and enjoyable! Begin with either a melt-and-pour soap base or a cold-process soap. While the soap is still in its liquid state, you can mix in a variety of ingredients to make it your own:
- Fragrance: Add 1/2 to 1 teaspoon of fragrance oil or 1–2% soap-safe essential oil (by weight) for a scent that matches your style.
- Color: Use a small amount - anywhere from a pinch to 1/4 teaspoon - of mica powder, natural clays, or other soap-safe colorants to achieve your desired hue.
- Texture: Incorporate dried herbs, flower petals, oatmeal, or exfoliants, using about 1–2 tablespoons per pound of soap base for added texture.
- Skin boosters: Mix in a teaspoon of nourishing additives like shea butter, honey, or vitamin E oil per pound of soap to give your soap an extra touch of care.
After blending your chosen ingredients, pour the mixture into silicone molds and allow it to cool for 30–60 minutes. Once set, you can unmold your soap. If you're using a melt-and-pour base, your soap is ready to use right away. For cold-process soaps, however, you'll need to let them cure for about four weeks before they’re ready.
To keep track of what works best, jot down your favorite ingredient combinations in a notebook. This way, you'll have a handy reference for future batches!
Why should I choose homemade soap instead of store-bought options?
Homemade soap lets you take charge of what goes into your skincare routine, helping you steer clear of harsh chemicals, synthetic detergents, and artificial fragrances. One of its standout benefits is the glycerin it contains - a natural moisturizer often stripped from commercial soaps. This helps leave your skin feeling soft and hydrated.
Another perk? You can tailor your soap to your tastes and skin needs. Add natural scents, colors, or extras like oatmeal and essential oils to create a bar that’s uniquely yours. On top of that, making soap at home can be a fun and creative project, not to mention a budget-friendly way to stock up on quality bars.