
DIY Hot Sauce: How to Bottle Your Own Heat in Under an Hour
Making hot sauce at home is simpler than you might think. With just a handful of ingredients - peppers, vinegar, and salt - you can create a bold, custom sauce in under an hour. Unlike fermented options that take weeks, this quick-cook method lets you enjoy your creation the same day. From mild and tangy to fiery and intense, you control the flavor and heat level. Plus, with a few finishing touches, your homemade sauce can double as a great gift. Let’s dive into the steps so you can get started today!
Tools, Equipment, and Safety
Before diving into the process, make sure you have the right tools and follow essential safety measures. Handling hot peppers requires care, as their capsaicin content can cause skin burns and eye irritation. This process is quick - under an hour - but safety is key.
Tools You'll Need
To get started, gather these kitchen essentials:
- A chef's knife and cutting board for chopping peppers and aromatics like garlic or onion.
- A kitchen scale for precise ingredient measurements by weight, ensuring consistent results.
- A non-reactive saucepan (stainless steel or enamel-coated) to simmer the sauce. Avoid aluminum, as it reacts with acidic vinegar and can affect the flavor.
- A blender or food processor to puree the mixture into a smooth sauce.
- A fine-mesh strainer to remove seeds and pulp, giving your sauce a silky texture.
- A funnel and clean glass bottles or jars for bottling. Glass is ideal for storage, as it prevents unwanted flavors, a tip supported by America's Test Kitchen.
Once your tools are ready, it’s time to focus on handling hot peppers safely.
Safety First
When working with hot peppers, protective gear is a must. Disposable gloves are essential to avoid skin burns, and for particularly fiery peppers like Carolina Reapers, consider adding a mask and goggles to shield yourself from airborne irritants. The National Center for Home Food Preservation emphasizes the importance of gloves during pepper handling.
Good ventilation is equally important. Rebecca Eisenberg, founder of The Practical Kitchen, shares this caution:
Be careful when you remove the lid from the pot - vinegar steam is pretty potent! It will definitely clear out your sinuses and make your eyes water.
Cook in a well-ventilated area or under an exhaust fan to avoid discomfort. When it’s time to bottle your sauce, sanitize the glass containers by boiling them in water. Fill the bottles while both the sauce and containers are still hot to ensure proper storage.
For a shelf-stable sauce, the pH level must be 3.8 or lower. Use pH testing strips or a digital pH meter to check acidity. If the pH is above 4.6, refrigerate the sauce and use it within a few weeks.
With your tools gathered and safety measures in place, you're ready to move on to choosing the right ingredients.
Ingredients and Flavor Building
Hot sauce begins with a simple trio: fresh peppers, vinegar, and salt. From there, the possibilities for customizing flavor are endless. Start by selecting your peppers - options like Fresno, jalapeño, serrano, or habanero bring varying levels of heat to the table. Then, choose your vinegar: apple cider vinegar adds a fruity note, while white vinegar brightens the flavor. A pinch of kosher or sea salt ties it all together, enhancing the peppers without overwhelming them.
To take your sauce up a notch, consider adding aromatics like garlic, shallots, or onions for a savory boost. Sweeteners such as honey, brown sugar, or even carrots can balance the heat with a touch of natural sweetness. For a citrusy edge, try combining white wine vinegar with a splash of lemon juice. As Rebecca Eisenberg, founder of The Practical Kitchen, explains, vinegar plays a vital role in both flavor and preservation:
Acidity is essential to a hot sauce. It's what keeps it shelf-stable... and it's also a big part of what makes hot sauces 'zing.'
Once you’ve got the basics down, it’s time to fine-tune your measurements and techniques to craft a sauce that’s just right for your taste.
Basic Ingredients
Here’s a simple starting formula: 4–6 oz. of fresh peppers (about 10–12 medium-sized ones), 1/2 cup vinegar, 1–2 garlic cloves, and 1/2 tsp. salt. This combination ensures a pH of 3.8 or below, which is key for shelf stability. You can stick to one type of pepper for a clean, straightforward flavor or mix several varieties for a more layered profile. Carrots are a popular addition - they bring sweetness, help thicken the sauce, and create a smoother texture without overshadowing the peppers’ natural taste.
Adjusting Heat Levels
The heat level of your sauce depends primarily on your choice of peppers. For a milder kick, go with Fresno peppers, which fall between 2,500 and 10,000 Scoville Heat Units (SHU). If you’re craving serious heat, habaneros deliver with a range of 100,000 to 350,000 SHU. To tone down the spice, remove the seeds and white ribs before cooking; these parts hold the highest concentration of capsaicin. For an even gentler sauce, blend your hot peppers with sweet red bell peppers in a 3:1 ratio of sweet to hot. On the flip side, if you’re looking to turn up the heat, keep the seeds and ribs intact or add a pinch of high-heat chili powder - like ghost pepper or Carolina Reaper - after blending.
Step-by-Step Hot Sauce in Under an Hour
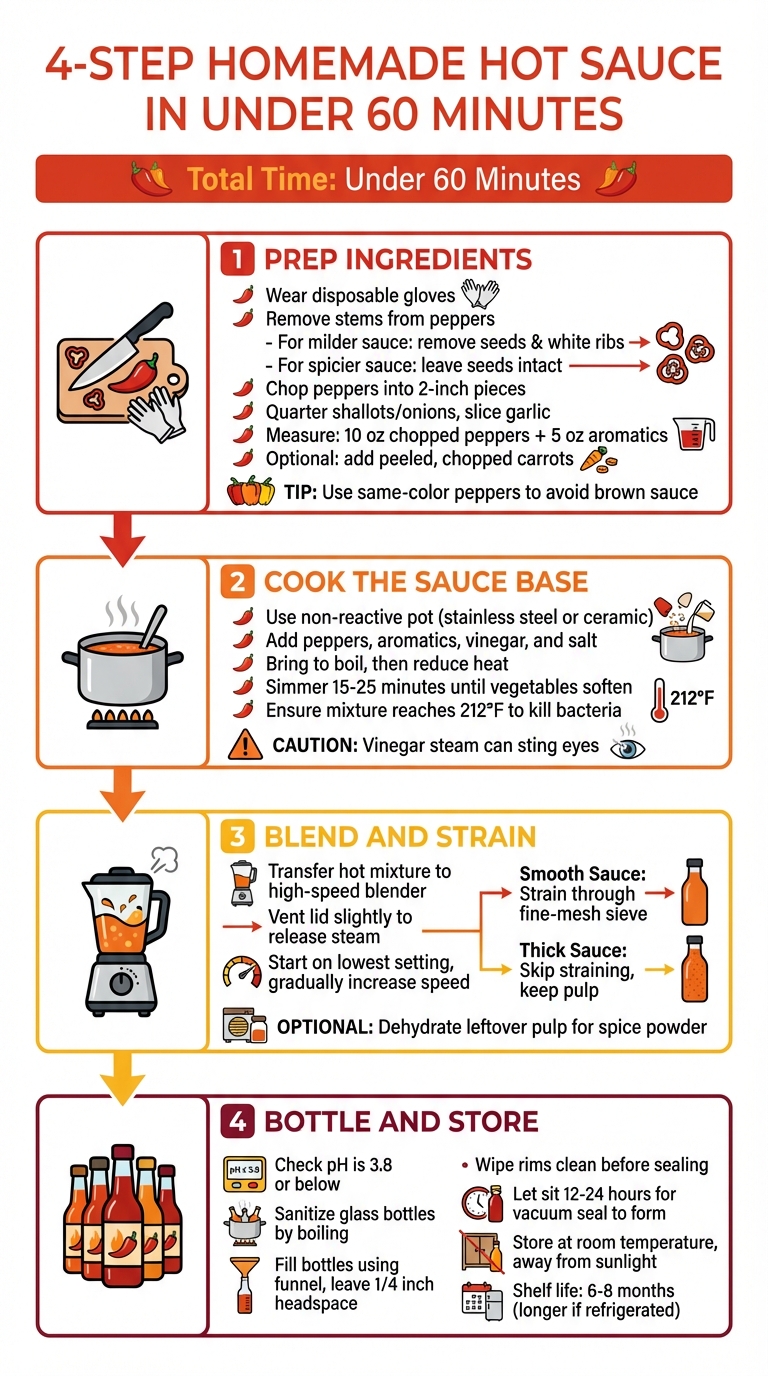
How to Make Hot Sauce in Under an Hour: 4-Step Process
Ready to turn those fresh peppers into a fiery, flavorful hot sauce? With the right prep and a little time, you can go from raw ingredients to bottled perfection in under an hour. This quick process is perfect for a weekend project or even whipping up a thoughtful homemade gift. Here’s how to do it in four simple steps.
Prep Ingredients
Before you start, slip on a pair of disposable food-safe gloves - trust me, you don’t want to accidentally rub your eyes after handling peppers. Begin by removing the green stems from your peppers. If you prefer a milder sauce, slice the peppers lengthwise and scrape out the seeds and white ribs. For a spicier kick, leave them intact. Chop the peppers into 2-inch pieces, then quarter your shallots or onions and slice the garlic.
To ensure a balanced sauce that’s shelf-stable, use a kitchen scale to measure 10 ounces of chopped peppers and 5 ounces of aromatics (like onions and garlic). If you’re adding carrots for a touch of sweetness and a thicker texture, peel and chop them now. For a visually appealing sauce, stick to peppers of the same color family - red or green - to avoid ending up with an unappealing brown mixture.
Once everything is prepped, you’re ready to move on to cooking the sauce base.
Cook the Sauce Base
Grab a non-reactive pot, like one made of stainless steel or ceramic, to avoid any metallic flavors from reacting with the vinegar. Toss in your chopped peppers, aromatics, vinegar, and salt, and bring the mixture to a boil. Once it’s bubbling, lower the heat and let it simmer for 15–25 minutes, or until the vegetables are fully softened. Be careful when removing the lid - vinegar steam is no joke and can sting your eyes and nose.
For safety, make sure the entire mixture reaches a boiling temperature of 212°F. This step is crucial for killing any harmful bacteria like Salmonella or E. coli.
Blend and Strain
With your sauce base cooked, it’s time to blend everything into a smooth, spicy mixture. Transfer the hot ingredients to a high-speed blender. When working with hot liquids, vent the blender lid slightly - leave the measuring cap in place but allow steam to escape - and start blending on the lowest setting. Gradually increase the speed for a smooth and steady result, avoiding any dangerous pressure buildup.
For an ultra-smooth sauce, strain the blended mixture through a fine-mesh sieve or cheesecloth to remove seeds and pulp. Prefer a thicker sauce? Skip the straining and keep the pulp in. If you’re feeling resourceful, you can even dehydrate the leftover pulp to make a concentrated spice powder.
Bottle and Store
To ensure your hot sauce is shelf-stable, check that its pH is at or below 3.8. Generally, using 4 ounces (1/2 cup) of vinegar for every 10 ounces of peppers and aromatics will achieve this. Next, sanitize your glass bottles and funnels by boiling them in water. Carefully fill the bottles using a funnel, leaving about 1/4 inch of headspace. Wipe the rims clean with a damp paper towel before sealing them with lids. As Eisenberg explains:
It is a combination of pH and food safe bottling practices that make your hot sauce 'shelf stable.'
Once sealed, let the bottles sit undisturbed for 12 to 24 hours to ensure the vacuum seal forms. Store your hot sauce at room temperature, away from direct sunlight, for 6 to 8 months. For even longer freshness and flavor, consider refrigerating it.
sbb-itb-8216914
Customizing Heat, Flavor, and Texture
Once you've nailed the basics, it's time to make your hot sauce truly yours. The beauty of homemade hot sauce lies in its flexibility - you can adjust the heat level, flavor profile, and texture to suit your taste. Whether you're after a mild, fruity drizzle or a bold, fiery sauce that clings to every bite, the possibilities are endless.
Flavor Additions
Give your sauce a personal touch with simple ingredients you likely already have. For a smoky twist, try adding dried arbol chiles or a pinch of chipotle powder while cooking. You can also char your peppers, onions, and garlic beforehand to deepen the flavor. If you’re leaning toward a tangy, citrusy vibe, swap white vinegar for apple cider vinegar and finish with a squeeze of fresh lime or lemon juice.
For those who enjoy a touch of sweetness to balance the heat, mix in fruits like mango, pineapple, peaches, or even blueberries during cooking. Liquid sweeteners such as honey, maple syrup, agave nectar, or brown sugar can also do the trick. If you’re after savory, earthy notes, add extra garlic, shallots, or cumin. A splash of tequila (about 1 ounce per 10 ounces of peppers) can also bring a subtle depth to your sauce.
Texture and Color
The texture of your hot sauce depends on how you blend and strain it. For an ultra-smooth, silky finish, blend the mixture at high speed and strain it through a fine-mesh sieve to remove seeds and fibers. If you prefer a thicker, chunkier consistency, skip the straining altogether or use a food processor to pulse the ingredients into a coarse purée. If your sauce turns out thinner than you'd like, simmer it over low heat to thicken or add a pinch of xanthan gum for a quick fix.
Color plays a big role in making your sauce visually appealing. Stick with a single-color pepper variety to avoid dull, muddy tones. Red peppers like Fresnos, habaneros, and red bell peppers create vibrant, eye-catching sauces, while green jalapeños and poblanos offer a fresh, herbaceous look.
Packaging and Presentation
Once your hot sauce is bottled, it’s time to focus on the finishing touches - packaging and presentation. These final details can transform your sauce into a gift-worthy masterpiece. With a few thoughtful additions, you can give it the polished look of a store-bought product while adding your own personal touch. As with any craft from This Month's Craft, presentation is the perfect way to bring your creative process full circle.
Labeling and Decorating
Choosing the right bottle is the first step. The classic 5-ounce "woozy" bottle is a popular choice for hot sauces, but options like swing-tops, Boston rounds, or mason jars can make your creation stand out. Just be sure the bottles are completely dry after sterilization to help your labels stick properly.
Your label should include key details: the sauce name, a full ingredient list, the bottling date (e.g., 1/11/2026), and a heat level indicator like a flame scale. You can design custom labels for free using online tools from providers like Avery, which offer templates for standard label sheets. If printing at home, use water-resistant label paper to prevent smudging. For a rustic vibe, consider chalkboard labels or cardstock hang tags tied around the neck with twine.
For a professional touch, add shrink bands over the caps. These tamper-evident bands are affordable when purchased in bulk and can be tightened using a heat gun or a high-powered hair dryer. For an extra-special finish, you can dip the bottle lids in hot wax. Including an orifice reducer in the bottle neck can also help control the pour.
Once your bottles are decorated, organize your supplies to make future projects easier.
Storing Craft Supplies
After finishing your labels and packaging, it’s important to store your tools and materials properly for your next crafting session. Keep extra twine, labels, stickers, and decorative tape in a designated craft box. Glass bottles should remain in their original cardboard boxes to protect them from dust and breakage. Store them in a cool, dry space at 68–72°F to ensure they stay in good condition.
If you’ve used brushes or foam applicators for tasks like decoupage or sealing labels, clean them immediately with warm, soapy water to prevent residue from drying. Aerosol sealers should be stored in a cool, well-ventilated area, and funnels should be cleaned and dried thoroughly before putting them away. This Month's Craft also offers storage solutions to help you keep everything organized and ready for your next creative endeavor.
Conclusion
Making your own hot sauce at home is easier than it seems, and the payoff is undeniable. In less than an hour, you can whip up a sauce bursting with the vibrant flavors of fresh peppers, capturing their essence at just the right moment.
The best part? You get to experiment. Try swapping in different vinegars, adding fruits, or blending in cooked vegetables to tweak the heat, texture, and flavor exactly how you like it. There’s no one-size-fits-all approach here - every batch is a chance to create something new and exciting.
Once you’ve nailed your recipe, take it a step further by designing a label that reflects your personal flair. It’s the perfect finishing touch to your homemade masterpiece and a nod to your creativity.
So, grab those peppers, heat up the stove, and dive into the satisfaction of crafting your very own hot sauce.
FAQs
What types of peppers should I use to control the heat level in my homemade hot sauce?
The type of pepper you select plays a big role in determining the heat level of your hot sauce. Here’s a simple guide to help you decide:
- Mild heat (0–2,500 SHU): Bell peppers, Anaheim peppers, or Hatch chilies deliver a gentle kick and vibrant flavor.
- Medium heat (2,500–15,000 SHU): Jalapeños and serranos strike a nice balance of spice, while ancho peppers add a mild, smoky sweetness.
- Hot heat (15,001–100,000 SHU): Cayenne, Tabasco, or orange habaneros bring bold heat with fruity or tangy undertones.
- Super-hot heat (100,001+ SHU): Ghost peppers or Carolina Reapers pack an intense punch and should be used sparingly.
Want to experiment? Combine peppers from different heat levels to craft a sauce that perfectly matches your flavor preferences!
How can I make sure my homemade hot sauce is safe to store long-term?
To make sure your homemade hot sauce is safe for storage, aim for a pH of 3.8 or lower. You can usually achieve this by adding about ½ cup of vinegar for every 10 ounces of peppers. Use pH strips or a digital pH meter to check the acidity level accurately. Once your sauce is ready, transfer it into hot, sterilized jars, leaving about ¼ inch of headspace at the top. Process the jars in a boiling-water canner for around 15 minutes (if using half-pint jars). Afterward, allow them to cool undisturbed to ensure the lids seal properly. Store the sealed jars in a cool, dark spot, and refrigerate them once opened.
How can I customize the flavor of my homemade hot sauce?
Customizing your hot sauce is a fun way to create something that suits your taste perfectly. Start by choosing your peppers - mild options like jalapeños or Fresnos are great for a gentle heat, while habaneros or smoked chipotles pack a fiery punch. Enhance the flavor by adding ingredients like roasted garlic, shallots, or a little honey or brown sugar to mellow out the heat. A splash of lime juice or apple cider vinegar can add a fresh, tangy brightness.
If you’re looking for a fruity twist, try blending in mango, pineapple, or fresh berries to bring in some natural sweetness. You can also layer in herbs and spices like cilantro, cumin, or smoked paprika for added complexity. For a savory spin, ingredients like soy sauce, miso paste, or roasted tomatoes can create a deeper, richer flavor. Want to take it up a notch? Let your sauce ferment for a day or two to develop a tangy, slightly sour edge. The combinations are endless, so get creative and make a sauce that’s all your own!